
Xenomai installation on a Beaglebone black
Xenomai is a useful tool for running real-time tasks on an embedded Linux platform such as the Beaglebone black. That comes in handy when building robotics applications.
A standard Linux installation can already be enough if you want to be a soft real-time application, with latency in the order of magnitude of a millisecond you could probably spin a loop at 100Hz easily. Xenomai allows you to go the extra mile: once installed, it runs a separate kernel from the Linux one that is capable of bringing latency down to the microsecond. Also the jitter decreases drastically thus allowing hard real-time applications to be built.
For the last few days, I’ve been trying to install Xenomai on a Beaglebone black. I found a few links but a lot of them were outdated and didn’t work for me as they were 1 2 3. So here’s my adaptation or synthesis of all that.
There are two ways you can install Xenomai on the Beaglebone black:
- The hard way which is most flexible but requires patching and recompiling the Linux kernel for the platform
- The easy way which is less flexible but uses a precompiled kernel with the Xenomai patches
Xenomai installation: the easy way (3 steps)
I discovered this method thanks to the Debian for Beaglebone black page 4.
1. Install Debian or Ubuntu on your Beaglebone
If you already have a recent Debian installed on your Beaglebone black, you can skip this step.
For Debian use this image:
wget https://rcn-ee.com/rootfs/bb.org/release/2015-03-01/console/BBB-eMMC-flasher-debian-7.8-console-armhf-2015-03-01-2gb.img.xzFor Ubuntu use this image:
wget https://rcn-ee.com/rootfs/2015-05-08/flasher/BBB-eMMC-flasher-ubuntu-14.04.2-console-armhf-2015-05-08-2gb.img.xzInsert your SD card, for me it’s under dev/mmcblk0
sudo -s
xz -dkc BBB-eMMC-flasher-*.img.xz > /dev/mmcblk0
exit
Once it’s done, remove the SD card from your computer and put it in the Beaglebone black. Press the S2 button while powering it with a 5V 1A minimum power source (protip: use a phone USB charger). The four blue user LEDs will light up one after the other, once all four are lit you release the button. The LEDs will start lighting in a K2000/Cylon style. Once all four LEDs are off, you can unplug it and plug it on your computer. Now you’re ready for the next step.
2. Update the Beaglebone’s kernel to a Xenomai-patched version
SSH to your Beaglebone
ssh 192.168.7.2 -l debianThen update and update the kernel
sudo apt-get update
sudo apt-get install linux-image-3.8.13-xenomai-r72 linux-headers-3.8.13-xenomai-r72 linux-firmware-image-3.8.13-xenomai-r72
Now reboot and SSH back on the Beaglebone
sudo reboot
ssh 192.168.7.2 -l debian
3. Install Xenomai userspace bindings
Download Xenomai 2.6.X
wget http://download.gna.org/xenomai/stable/xenomai-2.6.3.tar.bz2
tar xvjf xenomai-2.6.3.tar.bz2
Build and install it
cd xenomai-2.6.3
./configure
make
sudo make install
That’s it you’re done!
Xenomai installation: the hard way (~15 steps)
I have only tested this with Debian.
1. Installing prerequisites
sudo apt-get install u-boot-tools lzop build-essential libncurses5{,-dev} gcc-arm-linux-gnueabi git gparted2. Follow the Random Linux Hacks tutorial religiously
The two main drawbacks of this method are:
- It uses a Debian image from 1.5 years ago (7.5 from early 2014),
- It takes easily one to a few hours to setup.
What’s next ?
You can test Xenomai by running this as root
/usr/xenomai/bin/latencyYou should get something like this
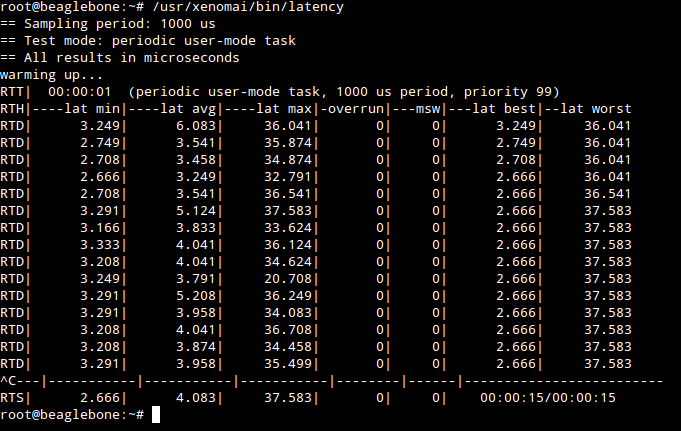
You’ll notice the latency and jitter are - as expected and promised - in the order of microseconds. Bear in mind that this is just a test and doesn’t reflect the performance of Xenomai under high CPU loads. We shall test that later.
You can go on and try other stuff under /usr/xenomai/bin/.
Or you might try using the Xenomai userspace API 5 to build a real-time application, I know that’s one thing I’ll be exploring.
References
-
Installing Xenomai on Beaglebone using Debian distribution https://randomlinuxhacks.wordpress.com/2015/02/22/installing-xenomai-on-beaglebone-using-debian-distribution/ ↩
-
Cross compiling kernels http://boundarydevices.com/cross-compiling-kernels-2014-edition-2/ ↩
-
EBC Xenomai page http://elinux.org/EBC_Xenomai ↩
-
Debian for Beaglebone black http://elinux.org/Beagleboard:BeagleBoneBlack_Debian ↩
-
Xenomai API reference http://xenomai.org/api-reference/ ↩